Friday, October 28, 2022

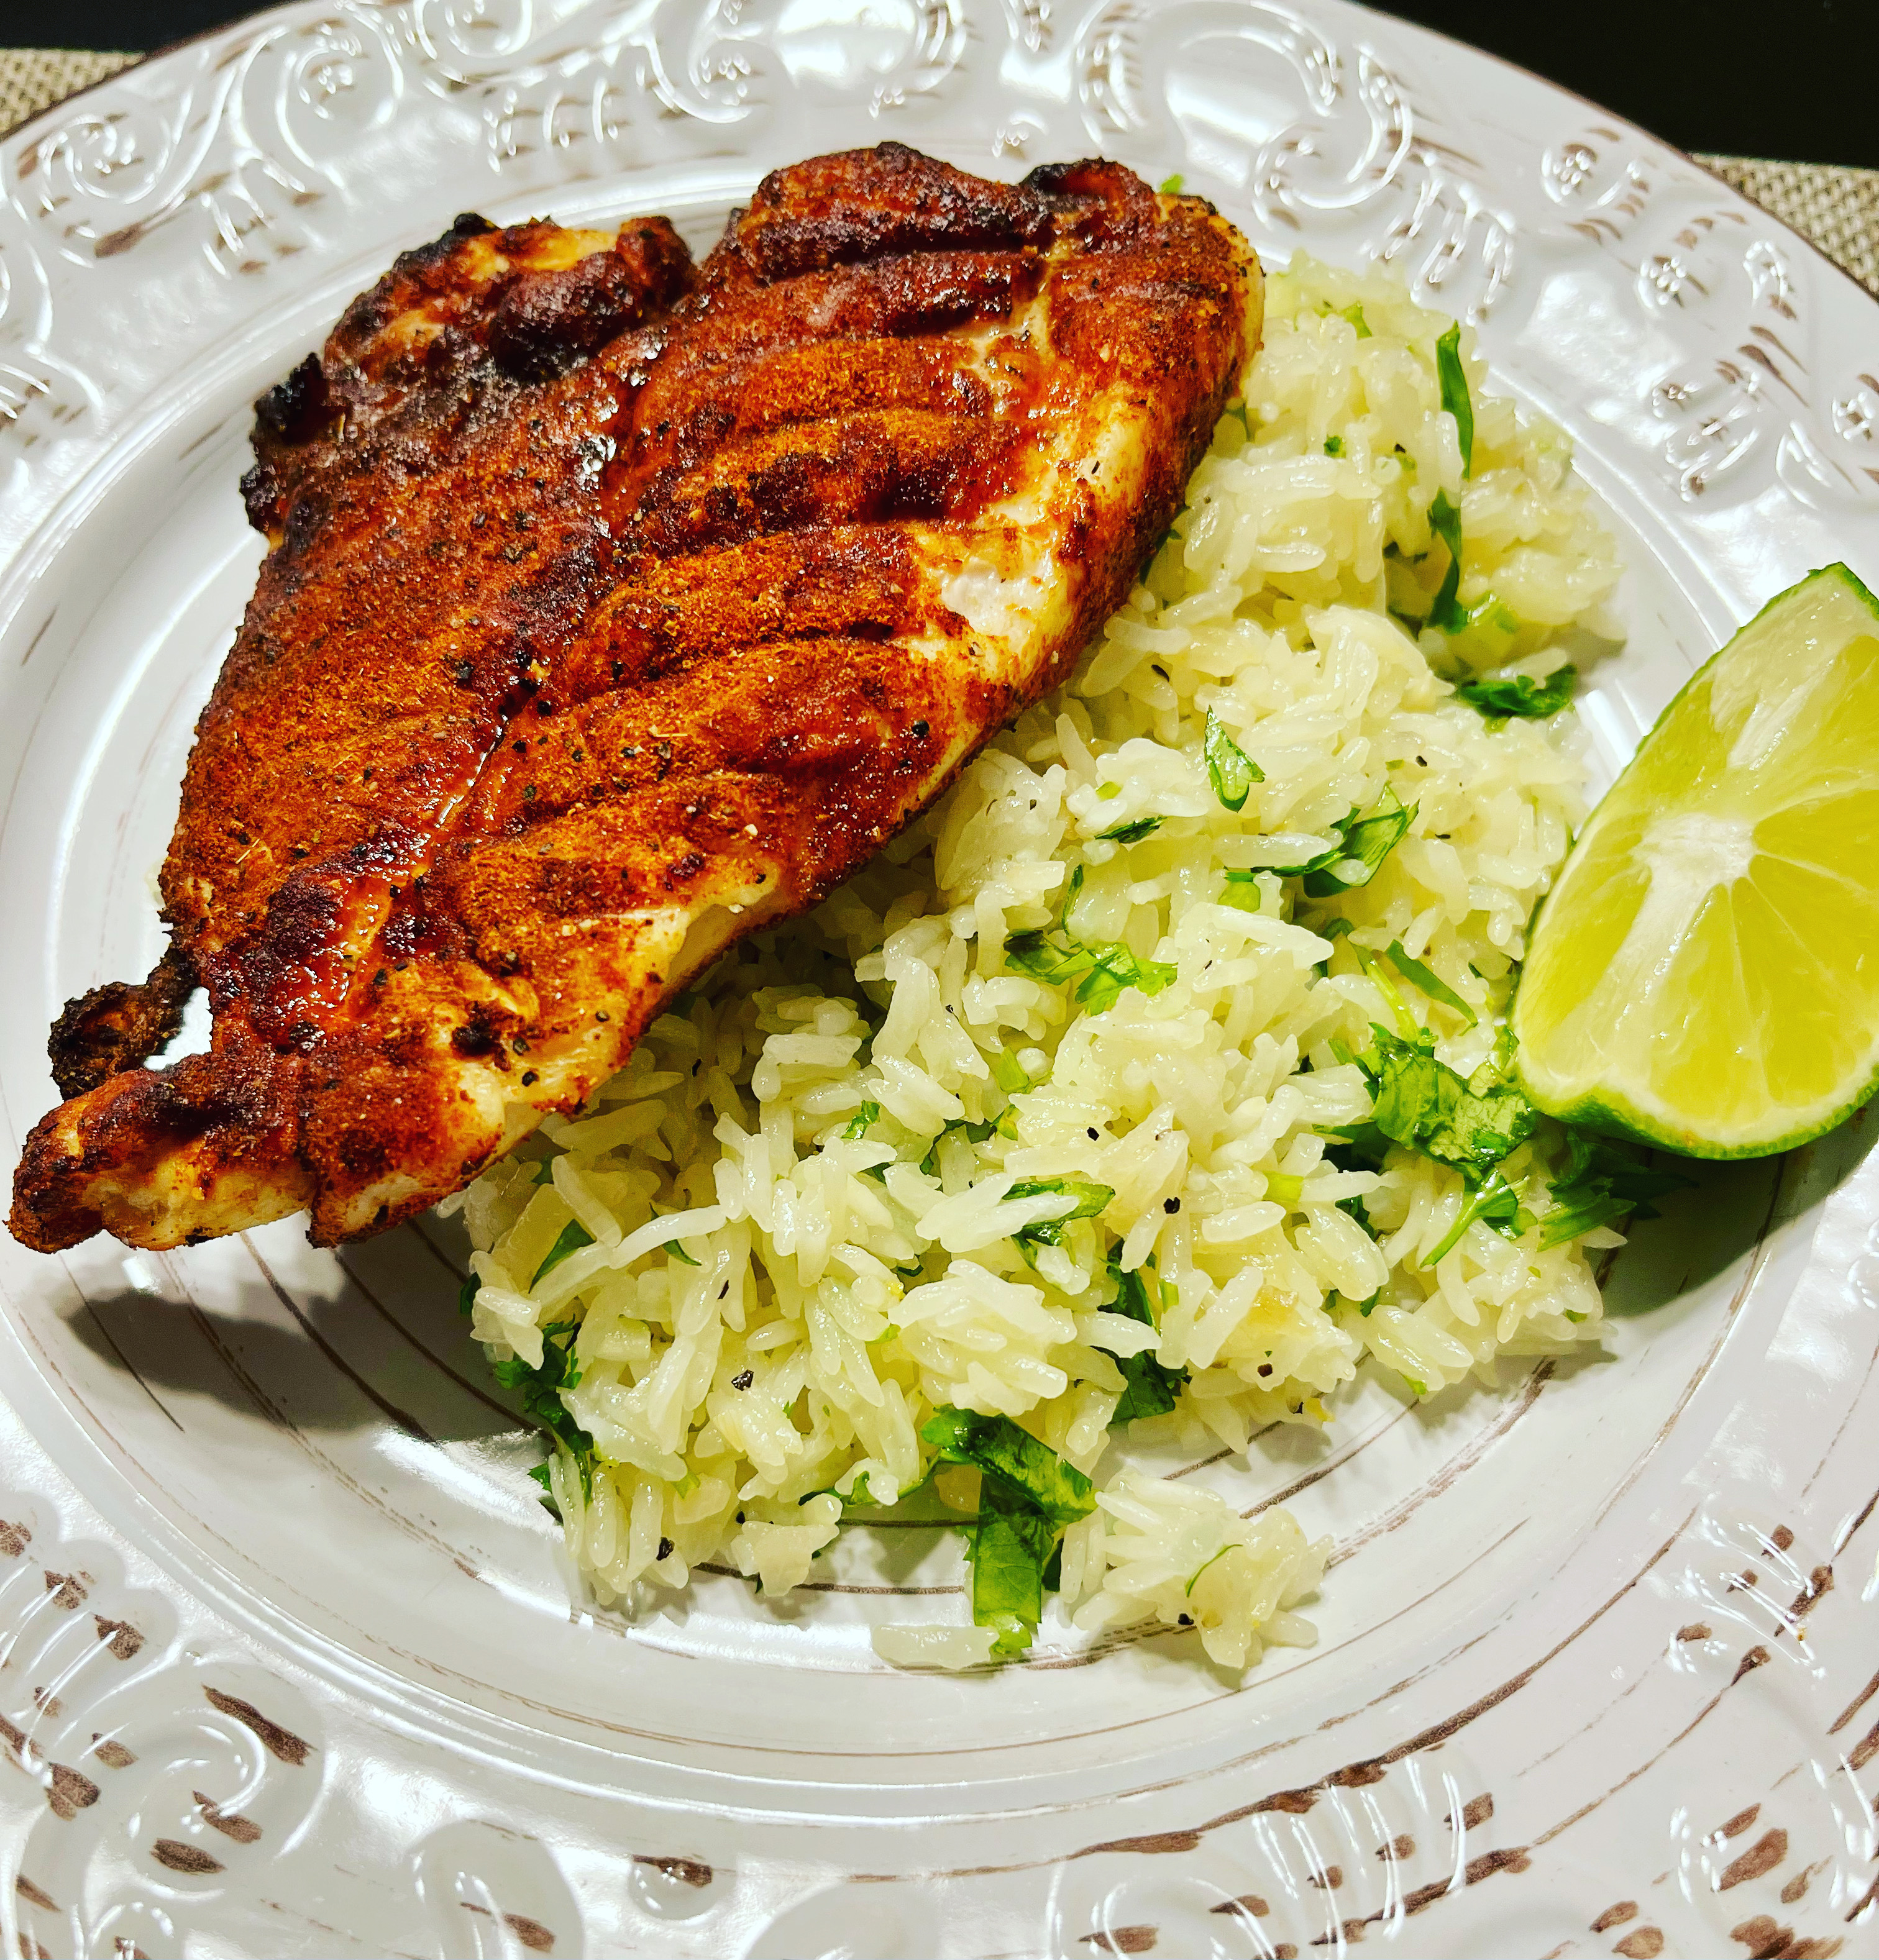
Air Fried Chipotle Chili Crusted Chicken Breast with Cilantro-Lime Rice


The air fryer is really a mini convection oven, and its applications are many.  You can heat leftover foods quickly, prepare fresh or frozen chicken wings, make hamburgers, cook a steak, bake deserts and so much more.

One of my very favorite spices for chicken is chipotle chili powder, which has just a tiny bit more spice kick than regular chili powder, without being overwhelmingly hot. This preparation uses chipotle powder almost like flour, creating a savory crust with a hint of heat.  As a side, I am pairing the chicken with the cilantro lime rice side.  I recommend basmati or jasmine rice for their aromas, but long grain white rice will work just as well. The rice will take longer to prepare, so we will start with that.


 Cilantro-Lime Rice

Ingredients:

1 cup basmati or Jasmine (long-grain white) rice

1-1/2 cup water

2 tablespoons olive oil, divided

Juice of 1 lime

1 tsp chicken bouillon 

1 tsp onion powder

1 tsp garlic powder

1 bay leaf

1 cup chopped cilantro, not too fine.

salt and pepper to taste

Directions:

Rinse the rice in a strainer under cold running water for a few minutes until the water begins to run clear.  In a large sauce pot or deep-sided pan put in the rice, water, the juice of half a lime, 1 teaspoon of olive oil, the garlic and onion powders, bouillon and bay leaf.  Stir and bring to a boil.  You will have to keep an eye on the rice, boiling it until nearly all the water has evaporated and little steam holes begin to appear on the surface of the rice.  This should take about 15 minutes.  Once the water is nearly gone, pull the pan from the heat, fluff the rice with a fork and cover it with a tight lid for at least another 15 minutes.  Do not peek!

The rice should be very fluffy at the end of this time and not sticky.  Pour the rice into a mixing bowl and mix in the juice from the other half of lime, the second teaspoon of olive oil and the chopped cilantro.  Taste for seasoning and add salt and pepper as desired.  Cover and set aside.


Chipotle Chili-Crusted Chicken Breast

Ingredients:

1 chicken breast, split or butterflied (you may also use chicken tenders)

4 tsp chipotle chili powder (you can use regular chili powder, but it won't have the little spice kick) 

4 tsp cumin

2 tsp Mexican oregano (or just oregano)

1 tablespoon olive oil

salt and pepper to taste

1 lime, cut in half

Directions:

Prepare the dry ingredients is a bowl, mix and spread on a plate or shallow baking dish.  Preheat the air fryer to 400 degrees for 3 minutes.  Make sure the chicken is dry and free of excess water.  Pour the olive oil on the chicken and rub on both sides.  Season to taste with salt and pepper.  Coat the chicken in the spice mixture on both sides, making sure all parts of the split breasts are coated.

Place the chicken in the air fryer and set for 6 minutes at 400 degrees.  At the end of the time, open the fryer basket and turn the chicken over.  If you have an instant read thermometer check to see if the chicken is 165 degrees.  If it's there, reset the fryer for 350 degrees for about 3 or 4 minutes to crisp the second side without overcooking.  You may need even less time for the other side.

Mound some rice on a plate and set the chicken up against it.  A squeeze of lime on the chicken adds a nice touch to the full flavor of the chipotle chili and will complement the rice.  This goes well with a Mexican beer!


Tuesday, September 13, 2022

Air-Fried Lemon Pepper Chicken Wings


 In recent years the air-fryer has become a staple appliance in many of our homes.  It crisps well, it's fast, and it requires the use of far less fats while  "frying" meats, potatoes and other food items.  That being said there are sometimes unsatisfactory results when preparing popular foods like chicken wings. They can come out soggy, undercooked or just plain bland.  Most of these problems stem from preparation.

If you want crispy, uncoated, yet juicy wings, here is the key; the chicken has to be as free from water as possible.  This means not air-frying them while frozen.  Also, there are some preparations which call for the wings to brine in buttermilk or salt water for a few hours or overnight.  If you are deep frying them in oil, this method works.  But we are not using much oil, and we are not breading the wings after they have been brined.  In fact, all we are doing is patting the wings very dry right out of the package, or if you prefer to rinse them, after they have been rinsed in cold water and drained from a bowl.

Here's what you need for a dozen wing parts (I don't use the wingtips):

Mix these seasonings in a small bowl - 

1 Tbsp Lemon Pepper mix, any brand

1 Tsp Kosher Salt

1 Tsp Garlic Powder

1/2 tsp Paprika

(Optional) Tsp Old Bay - this also contains salt, so be aware

Preparation -

Preheat the air fryer to 380 degrees for about 3 minutes.  While the air fryer is preheating. add the dry wings to a bowl and spray them with a cooking spray or pour a teaspoon of avocado oil on the wings and stir to ensure even coating. Next sprinkle the seasoning on to taste and mix the wings again to assure even coating of the seasonings.

I know at this point there are some methods which call for using a corn or potato starch coating for extra crispness,  This is certainly an option, but it requires the use of extra cooking spray to cover the each side of the wings during the cooking process.  That adds more fat, but again it's a choice.

Using tongs, place the wings well spaced in the air fryer basket so that they don't touch, which results in steaming and less than uniform crispiness.  Depending on the size of the basket this might require two batches.  If you have used a starch you will have to use your cooking spray to coat this side of the  chicken now.  Close the basket and set the fryer for 10 minutes at 380 degrees.

After the 10 minutes, flip the wings on their other side.  Use your cooking spray again to cover the starch on this second side if you used it.  Set the timer again for 10 minutes and 380 degrees.  At the conclusion of this time, flip the wings once more to the first side. This time set the timer for 5 minutes at 410-420 degrees, or what ever your air fryer permits, and reinsert the basket.

If you prefer Buffalo-style wings, while the you are in this final stage, Frank's Red Hot sauce or your choice of hot sauce can be added to a bowl and the wings tossed in from the air fryer.  Some would add melted butter to the sauce before tossing, but the added richness of the butter probably is not needed here.  Again we have choices, because it's a very flexible preparation.  It can be reduced fat, reduced sodium and keto-friendly, or you can include more fat and carbs in a coating.

I serve my wings with fresh cut celery stalks with ranch or blue cheese dips, or more hot sauce. A garnish of parsley or cilantro completes the serving. 


Tuesday, July 12, 2022

Oven Roasted Reverse Seared Beef Sirloin Tri-Tip


 The Sirloin Tri-Tip was first known in here in the US in Central California as the Santa Maria or the Newport Cut.  In recent years this relatively inexpensive cut has become known and more popular East of the Mississippi River. It's a triangle of meat that usually weighs about 5 pounds trimmed, and is a versatile and forgiving cut of meat, capable of being prepared many ways, from simple roasting to smoking, grilling to pan searing.  The meat is tender and favorable, as long as it is cooked medium rare to medium.  The fibers do tighten up considerably at higher temperatures.

Most recipes  that I have seen or read commonly call for the cut to be treated like a brisket, though it does not require nearly the twelve hours to prepare a tri-tip properly as it does a full packer cut brisket. The preparation method that I prefer is called the Reverse Sear, where the meat is seasoned, then smoked, or roasted at low temperatures until the internal temps are medium rare to medium, and then allowed to rest 15 minutes.  This ensures the juices are re-absorbed  into the meat.  The cut is then grilled or pan seared over high heat for color, which only takes a few minutes.  I like to marinade the meat overnight, but it is not necessary.  This recipe is based on a preparation by Sam Zien, of Sam the Cooking Guy on YouTube, and is easily my favorite.


Marinade:

1/2 cub low sodium soy sauce

1 cup olive oil

5-10 cloves crushed or diced garlic

1 tsp black pepper

Other ingredients:

1-2 tbsp. olive oil

1-2 knobs of butter

Sprig of thyme (optional) 

Directions:

Most tri-tip roasts from the supermarket have the fat cap and silver skin well-trimmed, but you may need to clean up these areas.  I don't mind a thin fat cap, especially if I'm grilling it over flames. The meat may be tenderized at this point if you have one, but it is not necessary.

Combine the marinade and pour it into a sealable gallon bag.  Seal the meat in the bag with the marinade and move it around to coat the entire tri-tip,  If you have overnight to let the meat marinade in the refrigerator that is great, but a minimum of four hours would be ideal.

Remove the meat from the refrigerator and let it set on the counter in the marinade for a hour, or until it comes up to room temperature.  Preheat the oven to 275 degrees.  

When the meat is a room temp, remove it from the bag and place it on a wire rack in a shallow pan. A meat thermometer comes in handy here.  Insert into the thickest part of the roast and place on the center rack, uncovered.  Roasting times will vary per oven, which is why it is best to use a meat thermometer.  For medium rare the meat should be pulled at 128-130 degrees.  For medium, 135 degrees is best.

Let the meat rest with a sheet of loose foil covering for about 15 minutes.  The meat will continue to cook internally while sealing in juices.  While the meat rests heat a cast iron pan over medium high heat and add some of the marinade to the pan if you wish, or a tablespoon of olive oil and a couple knobs of butter and the optional thyme sprig.  When the pan is hot, sear the roast about three or four minutes on each side, basting with the oil and butter as it sears.  You are looking for color, not to cook the meat any more internally.  

When the color you want is achieved, the meat can be removed and sliced immediately, because it has already rested.  Tri-tips have fibers running in two directions; the long end toward the narrow tip, and the short end running away at an angle. You can separate the meat at this juncture for ease of slicing. You want to cut across the grain, not with the grain.


Serving:

With the drippings from the pam and some of the marinade, its possible to make a pan gravy with a little flour.  Be sure to heat the marinade to a boil in order to avoid raw meat contamination.  The tri-tip also goes well with a chimichurri sauce dressing, made with minced cilantro, garlic, olive oil, salt and red pepper flakes.   


Saturday, June 18, 2022

Baked Barbecue Beans


 It is easy to grab a can of those commercial beans at the supermarket and toss them into a sauce pan and heat them up.  I'm not knocking it; we all have done that at one point of other in our busy lives while preparing meals for our families.  But if there is extra time available, why not prepare baked beans with a little more love, and a lot less sugar than is contained in our favorite store-bought brands?

It starts with the choice of beans.  I mean after all, they are the star of the show! You can use any kind of bean variety that you like, though the canned variety most often use Great Northern beans.  I prefer red beans personally, because they have a bit more texture and heft to them, which means more flavor to me.  I prefer them dried and soaked in water overnight, but if pressed for time, a couple of low sodium canned red beans, liquid drained are a suitable alternative.  If using dried beans, don't salt the soaking or the cooking water, because that can toughen up the red beans.

Preparations:

Drain the soaked beans and place them in a pot of fresh water, bringing them to a boil in a medium large pot.  Some folks like to add pork shoulder or some type of smoked meat with onions in this step, but I prefer to control the amount of fat.  But that's an option available.  Turn down the heat and simmer for about an hour.  While the beans are simmering, the ingredients for the sauce may now be prepared.

You'll need:

1/2 medium onion, diced

1/2 red bell pepper, diced

1 jalapeno pepper (optional), seeded and diced

3-4  strips thick cut bacon, diced

1/3 cup brown sugar

1/3 cup molasses

1-1/2  cups of barbecue sauce, any variety (less sugar varieties are best)

1/4 cup ketchup

1 tsp Worcestershire Sauce 

1 tbsp yellow mustard

1 tbsp smoked paprika

1 tsp chili powder

1 tsp garlic powder

1 tsp onion powder

Salt and pepper to taste

Directions:

Heat the oven to 350 degrees.  Sauté the diced bacon in a large pan until the fat renders, then add the chopped onions and peppers, heating until the onions are clear.  In a separate bowl combine the wet and dry ingredients and stir to combine, then pour the prepared sauce into the pan, stirring until incorporated.  Let it come to a simmer, but do not reduce.

Drain the beans and pour them into a large casserole dish. Pour over the prepared sauce from the pan and combine well in the dish.  The sauce will appear a little thin at this point. If you are adventurous, strips of bacon may be laid over the beans, but it's totally optional. Place the dish in the oven, uncovered for about two hours, or until the sauce has reduced.

At the end of this time the casserole dish may removed.  The excess liquid should now be reduced and the beans nestled in their thick sauce.  Spoon out and garnish with parsley next to your smoked or barbecued meat of choice.  It's so much better tasting than the old canned standbys! 

Friday, June 17, 2022

Easy Oven Baked Baby Back Ribs


Nothing really says summer like smoking, grilling or barbecuing ribs in the back yard or on the patio.  But let's face it, mother nature sometimes doesn't want to cooperate.  You have that taste for ribs, but it is rainy, too cold, or as often is the case here in Arizona summers, the temperature is too hot, over 110 degrees.  Who wants to cook outdoors in those conditions?

But there is an easy alternative, even in the most inclement of conditions - our kitchen ovens.  I like baby back ribs because they are more meaty, but spareribs will also turn out great in this recipe. As for dry rubs, there are many, from your favorite bottled dry rubs to home made.  And if those don't suit your tastes, even salt and pepper will work great.  Below I'll list the ingredients that I like to use for my custom dry rub.


Preparation: Preheat your oven to 350 degrees

Pork ribs a have a membrane on the bone side that I like to remove.  Some keep it on, but I find that my ribs come out more tender when this silver skin is removed.  To remove it, use a butter knife and push it under the membrane alongside one of the bones near the end of the rack.  Give it a tug up, then grasp the membrane with a paper towel and pull it away from the ribs.  Then pat the rack dry on both sides.

For a spice binder when I'm smoking outdoors I like to use plain old yellow mustard, spread lightly across both sides of the ribs. For indoor cooking, olive oil will give the ribs a nice crispy crust.  Use a brush to coat the ribs on both sides.

The Rub:

There are some great commercial dry rubs easily available in the supermarket.  I have used them, and have even used Old Bay, which works great too.  My favorite scratch-made rub is as follows:

1 tbsp kosher salt

1 tbsp black pepper

1 tbsp garlic powder

1 tbsp onion powder

1 tbsp smoked paprika

1 tbsp chili powder

1/2 tsp cayenne pepper (optional)


Procedure:

Season the oiled ribs generously on both sides with the rub.  Place the ribs on a large cookie sheet over aluminum foil, do not cover.  Bake the ribs on a middle rack for two hours at 350 degrees.  At the end of that time, carefully removed the ribs from the foil and replace it with new foil.  Turn up the oven temperature to 450 degrees.

While the oven heats up, place the ribs back on the cookie sheet and liberally brush on your favorite barbecue sauce. When the oven is at temperature place the ribs back in the oven for ten minutes.  Set a timer for this so it's not left in too long.

Now set the oven to broil and place the ribs on the top rack for three minutes.  It might be helpful set the timer once again.  Pull the ribs out and let them rest for a few minutes; they will be very hot.

Brush on more barbecue sauce and enjoy with baked barbecue beans and a creamy, crisp coleslaw.  These ribs are not the fall off the bone variety, but they are very tender.


Monday, March 8, 2021

Medicare: My Experience Navigating Through Enrollment


If you are in that elite group of folks, like me, who are about to turn 65, you are no doubt being bombarded by robocalls and junk email imploring you to sign up for a Medicare supplement plan of some kind to augment the coverage Medicare provides. And of course if you watch daytime television, just about every hour there is some Medicare coverage plan being advertised, especially during the enrollment period.  They like to use the word "free" a lot. This article is not about detailing choices for you, because I am no more than another fish swimming in the Medicare sea, with no special knowledge.  There are others sources far more knowledgeable than I am.

For more in depth information I would urge those who need it to log onto www.medicare.gov, or simply call your Medicare office for specific information.  I would not go online and give personal information like phone numbers or email addresses some of these companies advertising on TV.  Expect to be deluged with calls, texts and emails if you do.  

My goal here is to discuss my own recent experience, and some of the steps that I took to get answers to my questions.  My situation will not be the same as yours, so your choices will be different. But I would advise everyone to go directly to the source first, that is Medicare or Social Security.  If you don't have one, sign up for a secure account on their websites, and keep passwords safe and secured.

I retired early from teaching at age 62; while teaching I enjoyed a relatively low cost, school-district subsidized health insurance through one of the major healthcare providers .  I was in relatively good health and on a PPO plan; I liked my doctor and the plan benefits, so naturally it was a no-brainer for me to continue paying on my own through the pre-Medicare years of my retirement.  Also, knowing the political uncertainties in ACA, that decision seemed like a safer, though more expensive choice.  And expensive it was; my monthly premiums in retirement, even with a supplement from my state's pension system, was nearly $700 a month.  That's a far cry from the $120 a month single coverage I enjoyed as a fulltime school employee.  

But this is a a lament that so many retired teachers and other government workers have had to voice, and I was not supporting a family anymore.  If I had been on a family plan, my monthly costs would have been well over $1000 monthly.  So obviously, I was very anxious to learn how Medicare coverage would reduce my monthly healthcare costs.  I had been able to deduct my premiums on my tax returns, thankfully, but it still has been expensive.

There are a lot of terms and phrases that that you have to become familiar with, starting with Original Medicare, enrollment periods, Medicare Parts A, B, C and D, Medicare supplemental plans, Medigap plans, Medicare Advantage plans, HMO, PPO plans inclusive. There is so much more.  What were these plans, and how could I tell what was best for me?

I actually started my search on YouTube.  Being a visual learner, I found  many channels there which helped me to define better what my choices were, and where I was currently.  In addition, my state retirement board and Social Security had each mailed packets of good information, which I used to further refine my knowledge.  Going on the Medicare site also provided a great deal of background material that I knew I would need.

Ultimately, what helped me most was being a member of AARP.  Through them I learned that my own healthcare company offered several AARP-endorsed Medicare plans to cover Part C and D, plus dental and vision.  I obtained spreadsheets from other companies too, and finally decided to contact my insurance company directly, working though a local agent.  I settled on one of their PPO Medicare Advantage plans that seemed closest to what I was already paying for, at a fraction of my current cost, beginning on the first of my birth month.  Ironically as I was recently working with my agent over a Zoom call, my Medicare card actually arrived.  Social Security had automatically enrolled me 90 days ahead of my birthday.

There are a lot of details here which informed my choices, but I don't want to get bogged down in them because my situation probably won't apply to others.  I'll just say that there is no need to feel apprehensive about the process.  There is simply too much information material available to throw up your hands.  Reach out to the government agencies.  If you are a phone person, you can easily find a person-to-person contact there to help you.  If you are like me, I like to compare visual information, so online resources worked best.  At the very least, you can contact your own healthcare provider for answers.  

The best thing about Medicare coverage is that you are not forever locked into a plan.  If a specific plan isn't working for you, it can be changed during the next enrollment period.  Ultimately we are responsible for our own choices; if we have the best information available, we are in a much better position to make good choices.  Good luck!


Wednesday, August 26, 2020

Easy No Knead Bread


 People often find bread making an intimidating task, and yes we are talking about some basic chemistry here anytime we contemplate baking, but we are not building an orbital booster here! All we want to do is make an easy bread using some basic equipment any home cook likely already has.  The one piece of equipment that might be lacking is a Dutch oven.  But even if you don't have one, a good cast iron skillet will work! And don't worry, you don't need a fancy, expensive stand mixer either.

This recipe is also beneficial on a couple other fronts.  If you've been in the stores during the current pandemic you might have found that yeast is sometimes hard to find.  And if you have yeast, you may be asking yourself if you have enough.  Well this recipe only takes 1/4 teaspoon of yeast, so if you find yourself scraping the bottom of that yeast jar, you'll probably have enough.

Also, people with arthritis will find this recipe useful because their is no kneading involved.  Basic chemistry and mother nature will take care of that.  You will need a scraper, or a spatula, which I use to shape the dough into a ball. If you are on a Keto diet, you can substitute almond or coconut flour.

Ingredients:

3 cups of bread flour or all-purpose flour (either will do), sifted into a large bowl.

1/4 Tsp yeast

11/2 cups hot tap water (no hotter than 130 degrees, or it will kill the yeast)

1 Tsp salt

1-2 Tbsp of flour reserved for the bench to shape the dough

Two large bowls, one filled with parchment paper

Preparation:

Combine the salt and yeast with the flour in the bowl and mix.  Then pour in the hot water and mix with a spatula until the until the flour begins to come together, and no dry flour is on the side of the bowl.  Cover this bowl and let it stand for at least three hours.

After this time you will see that the dough is bubbly and should have nearly doubled in size.  Flour your working area and pour the dough out onto it, taking a spatula or a scraper and folding the dough over several times into the shape of a ball.  Sprinkle more flour if you find the dough too sticky to work with.

Now take the dough ball and place it in the clean bowl in which you have placed a large sheet of parchment paper.  It is okay if the parchment spills over the side of the bowl.  Cover this bowl with a towel for 30 minutes.

While your dough is rising a second time put into a cold oven on the middle rack the Dutch oven with the lid on, and then preheat the oven to 450 degrees.  When the 30 minutes have elapsed, carefully remove the dutch oven from the stove with mitts and set aside on a heat proof surface, removing the lid.  A large elevated wire rack works great for this, or if you don't have one the stove top will be fine. Then carefully lift the parchment and dough ball out of the bowl and place them inside the dutch oven, replacing the lid.

Return the Dutch oven to the oven and bake, lid on for 30 minutes.  At the end of that time remove the lid and continue to bake for another 10-15 minutes, until the bread is a nice golden brown. At the end of this time, remove the Dutch oven from the stove and let cool off on the rack or stove top.  It bears repeating that the Dutch oven and lid will be extremely hot during this, so please exercise due caution when handling it.  Handling the hot Dutch oven is not a task for kids!

The bread will be very easy to lift out of the Dutch oven by the parchment paper and will have a nice rustic look.  There are all kinds of variations for topping this bread while baking, but the standard recipe above works well. 

If you do not have a Dutch oven, you can use a good large cast iron skillet.  You won't be able to cover it, but the bread will rise just fine.

If you desire to have your bread rise overnight for baking in the morning, use cold water rather than hot.  That will increase the proof time to eight hours, but the results will be the same, a nice bubbly dough ball that has self-kneaded by the action of the yeast!   Enjoy!


Saturday, January 18, 2020

Vegan White Bean Chili


I love all kinds of chili, and during January will very often go on a meatless diet for four to six weeks. in an attempt to rid myself of carnivore toxins (and maybe some bad cholesterol too!).

Beans are an excellent source of protein during these diets, and I am always on the lookout for recipes which will be satisfying, yet suitable to replace the proteins that I am not taking in from animal products.  Great Northern Beans are an excellent substitute for these proteins and are flexible enough to work well in so many dishes.  They are my go to bean when I am looking to change out animal protein.

I'm going to give you two preparations for dried beans, one using the ubiquitous Instapot pressure cooker, and one using the old fashioned soaking method.  You can of course cut out these methods by using drained canned beans as a substituent, but I like to use the pressure-cooker bean juice too.

Traditional Bean Preparation

Pick through one pound of dried beans for stones, imperfections and other foreign objects such as twigs.  Rise the beans under cold water and place them in a sauce pot of salted water (about a teaspoon of salt to six cups of water).  Cover and let sit for eight hours minimum, or overnight.  Drain the water and add fresh salted water before bringing to a boil.  Reduce heat and simmer for about an hour, or until the beans are tender.

Instapot Preparation

Pick through beans as above and rinse.  Place in the Instapot and add up to six cups of low sodium vegetable stock.  Secure the lid and set the Instapot for 45 minutes, allowing the steam to vent naturally.  This will take an additional 15-20 minutes.

Chili Ingredients

1 onion, diced medium
1-2 jalapeno peppers, diced medium
1 red bell pepper, diced medium
1 tablespoon olive oil
2 tablespoons tomato paste
2 cups diced cherry tomatoes
4 cloves garlic, fine diced or pressed
2 cups vegetable stock
2 tablespoons chili powder
1 tablespoon cumin
salt and pepper to taste
Sprigs of cilantro, chopped
Baked corn tortilla chips

Directions

Prepare the beans first.  (If using the Instapot, you can do this beforehand and then saute the vegetables and cook the chili right in the unit.  I chose to use the stove top for final preparation). Saute the vegetables until the onions are clear and the garlic is fragrant, over medium heat.  Add the tomato paste, stir and cook until the paste begins to change color.  Ladle in the beans, with their juice, and add the sliced cherry tomatoes and spices. Now add the vegetable stock, cover and bring to a boil.  Reduce the heat and simmer for about an hour.

Depending on how hearty you want your chili,  you may want to add more vegetable stock or water if it is too thick at this point. Check for salt and add chopped cilantro before serving.  Reserve a sprig or two of cilantro for garnish, as well as a few baked corn tortilla chips.

If you are like me and discovered during this meal prep that you were out of chili powder, you can make your own! Here's how:

1/8 cup paprika
1 teaspoon smoked paprika
1 teaspoon garlic powder
1 teaspoon onion powder
1 teaspoon cumin
1 teaspoon dried oregano
1 teaspoon adobo powder (optional)
1/2 teaspoon cayenne pepper


Tuesday, January 7, 2020

How Long Should a Beginning Brass Student Practice?


This is an old question that band directors and private teachers have to answer all of the time from beginning students and their parents.  Often times students think that their twice a week band class or their once a week private lesson, if they are fortunate enough to afford them, is all the time they need to put into music study in general, and brass playing in particular.  As a retired band director and current private teacher I was always very hesitant to put a number on minutes to practice or the frequency, because students will tend to do just that much and no more.

What I do teach them to how to practice, and how to establish a good practice habit, and then commit to it consistently every week, class/private lessons not counted.  Instead of focusing on the minutes on a clock, I break down the session into different activities, each with the idea of achieving some overall goal for that day.  This gets them out of the mindset of just filling up twenty minutes with unstructured noise and then boom, horn goes in the case.

Not only do I teach this approach, I reinforce it by structuring lessons, and even my rehearsals when I taught school the same way. All the while I prompt students to think about what wee are doing and why we are doing it. Rather than assigning minutes to an activity, I ask them to think more about repetitions, specifically being able to repeat something without errors before moving on to the next activity.

It's a never ending struggle to keep kids focused in this way, because they (and we as adults too) are so preoccupied with our phones, video games, computers and television.  Practicing a musical instrument is time consuming, because it requires an investment in that time to develop specific instrument-related motor skills.  That's an old world idea that may not be compatible with today's instant gratification mindset.  Any skill that requires repetition to improve on will run into this resistance, because our devices teach us that we can find answers instantly by swiping a screen or using our thumbs to key in words on a search engine.

If you want to be a good shortstop in baseball, you gotta take a lot of ground balls. That takes a lot of time.  If you want to become a good trumpet player, you've got to develop the fine muscles in your face to make a good sound, supported by proper use of your air. That too takes time, through doing it consistently.

What is this structure that I teach? With brass it begins with the mouthpiece.  I start every lesson, every practice session with mouthpiece buzzing.  A good buzz happens when you have the mouthpiece set in the right place on the lips, which will vary slightly from one person to the next. I work to achieve a long low buzz sound using, without puffing the cheeks, then trying to make sirens with the buzz, varying the frequency of the buzz in the upper lip (the lower lip should not buzz).  Later I encourage students to buzz scales as they become more advanced, or even tunes that they can buzz by ear.  Only when the buzz can be made cleanly do I encourage the mouthpiece to be put on the horn.

Once the horn is assembled the next activity is to use the same buzzing technique to produce long tones on the instrument, and then work on lip slurs from one partial to the next, until they can be done cleanly.  The more advanced the student is, the more involved the lip slurring can become.  But again, repetition until success is the goal.

There is an old approach called the Caruso method, which involves keeping the horn on the face while playing a limited number of notes through playing or resting periods.  I'll discuss that method more in a later article, but even beginning brass players can do this, and I emphasize it as a warm-up activity even for kids just starting out.  Again when it can be done quietly and cleanly, that's the signal to move on.

As students become more advanced in age and experience scales may be worked on at this point, though a beginning fifth grader might only be able to play the four or five notes of a Bb Concert scale at this point.  If using the Caruso approach, they may use those first four or five notes of that scale anyway, a two birds at once sort of thing.

Kids will play what they know in their song practice list, and then disregard everything else.  I teach them to think of the song portion of their practice routine as a runner might think of warming up before a race.  I ask them to find something that they know and like to play for fun, and invite mom and dad or others in the house to listen.  Once this mini recital is over, dismiss them and then try to play the assigned lesson, song, or etude next, taking as much time as they need on something that gives them trouble.  If they have questions about a note, or rhythm or something they can't quite get, write that question in pencil directly over the measure (s) that give them trouble. If they can, then skip over it and finish by playing what they can to the end.

I also teach kids to have closure.  Never end a session by feeling bad about your playing,  Go back and find something that they know or have fun playing, and play it a couple of times.  Maybe change the tempo, or do something different to it that they can play without mistakes.  Sometimes young brass players will fatigue here.  That's okay.  Play to failure and them stop!

Not once here did I emphasize emphasize time elapsed.  If all these steps are taken, even at the most basic level, thirty to forty minutes will fly by.  That's a good structured expenditure of time.  And the good news is that as the player advances more material can be added to expand the session.

I always teach students to set a little goal for themselves every day they go into a practice session; perhaps a better buzz, learn one new note or fingering, play a note that they haven't reached cleanly before, or maybe even just holding a tone for longer than four or eight beats without gasping for breath.  With these type goals in mind, the session now has a purpose other than just blasting random notes for ten minutes, or playing Hot Cross Buns for five minutes. Structure is the framework for developing progress.

Monday, January 6, 2020

Chicken Soup for Two


I've done a chicken soup on these pages before, but they were large recipes, for four or more people.  The challenge is to make these recipes suitable for one or two people, which is sometimes not so easy.  But this one truly is.  The key is to find Better Than Bouillon, a great extract that enhances chicken stock flavor immensely.

INGREDIENTS

1 boneless chicken breast or thigh, cubed
1/4 onion, finely chopped
2 celery stalks, cut on a slight bias
2 cloves crushed garlic
1 tbsp olive oil
1 box low sodium chicken stock
1 heaping teaspoon Better Than Bouillon chicken extract
1 teaspoon dried thyme
1 teaspoon dried rosemary
1 teaspoon dried parsley
1/2 cup frozen mixed vegetables
1 cup dried egg noodles
salt and pepper to taste

Heat the oil in a medium saucepan over medium high heat. Dice the onion and celery and saute until the onions are clear.  Add the garlic and spices, continuing to saute until the garlic is fragrant. Take care not to over salt, as the chicken stock extract has plenty of salt already. At this point add the chicken and cook until it is no longer pink.  Add the Better than Bouillon and stock, bringing to a boil.  Cover and reduce the heat to medium.

Now add the dried noodles and the frozen mixed vegetables. cover until the noodles are soft..  Serve with a crusty bread or crackers and a dry white wine!


Sunday, January 5, 2020

Chinese-Made Brass Instruments; Thoughts from a Retired Educator and Active Musician


It has been a little over a year since I last contributed to this blog page, though I see that there has been over 8,000 views of it since I started it.  In that time I've pondered whether to keep the page, or scrap it.  I've in the past written on some important events in my life and teaching career, shared favorite recipes, and featured some photos that I have taken as part of my other hobby, photography.

These are all great subjects, and I am sure that each one of them (and more) is worthy of the time, but I do believe that I do have something of value still to share in my chosen profession - music education. As such I believe that my views, insights and tips can help students and guide parents as they navigate through the modern world of music study in the 21st century.

So while I will continue to share recipes and tips on photography that I have learned, I want to focus for now on subjects and that can help both students and parents in school music programs.  I will be talking a lot more about playing and practice tips, music education and theory topics and equipment choices, all aimed at the 5-12 grade music student experience.

Today let's talk about student brass instruments.  When I was a young pup starting band in the mid-1960's, families in my neighborhood could not afford to buy musical instruments, so our local school loaned them out to students.  For brass instruments it was the venerable Olds Ambassador line cornets and trombones and baritones, or the occasional Conn.  These were well built tanks, with heavy bracing and high grade brass and nickel joint ferrules and durable lacquer finishes, capable of withstanding the pounding and neglect that a 5th grader could heap upon them.  In hindsight they weren't always free blowing, but they could take the abuse.  Today they command respect and can fetch a tidy sum on the open market, because they were so well built.

As I advanced into high school I began to look at other American makers more seriously; Bach, Conn, King and Holton, if anything because I figured that I had outgrown the old school instruments and kids were buying them with money they had saved from summer jobs.  But I was still poor, and for the time being I still played on a school horn.  My father purchased for me a used Buescher trombone, a nickel-plated odd ball, in my senior year, which I carried in my first year of serious music study at DePaul University in the mid-1970's.  It was a conversation piece to be sure.

By then, Yamaha had begun to make important inroads into the brass instrument market.  I remember being asked to play a school-owned Yamaha silver-plated euphonium for the DePaul wind and concert bands.  It was a dream, and I carried the horn around with me everywhere.

In those days, Yamaha was following the Asian manufacturing model - copy successful American and European brands until they could reproduce them equal or better to the originals; only then could their own innovations and characteristics be allowed to come forward. Their model for the euphonium was obviously the French Besson, which I played as an undergraduate as well, but preferred the Yamaha. 

A little more about my journey with brass instruments before I turn to the current climate facing today's students and parents.  About my sophomore year at DePaul I turned to trombone full time, ditching the odd Buescher my dad had bought me in high school.  My trombone teacher, Mark McDunn, was a clinician for the Selmer company and had subtly suggested that I consider a Selmer Bolero, a .509 bore tenor trombone that he himself played.  I agreed to buy one and he offered to pick up a horn off the assembly line on his trip to the Paris factory in the summer of 1976.  He sold it to me at cost, about $680. a bit of a King's ransom in those days, but I was working in the summers and managed it.

The horn was the best that I'd played to date; open, bright and penetrating, with a fine slide and resonant hand-hammered bell.  But it later proved to have one of the worst lacquer jobs I'd ever seen; my hands and neck would turn green from the contact points with the metal.  Maybe that was a positive sign of how much I was playing in those days, but I did not enjoy that.  I eventually sold the horn after I got married much later, but now regret doing so.  I could have had it refurbished, but being a newlywed, we needed the money.

In graduate school during the early 80's I purchased what I considered the standards in tenor and bass trombones, the Vincent Bach Stradivarius 42B and the 50B. Both of them turned out to have build quality issues and were real dogs, with very noisy valve linkages and workmanship.  I played them though grad school and beyond, but ditched both for a Getzen bass trombone in the 90's, a horn which I love and still play principally today.

So a long discussion leading up to today's world, in which students and parents are presented with a flood of brass instruments from so many different new markets, at all price points.  Instruments from the Pacific Rim are bountiful, as are domestic and European models.  The question is, which is right for any given student? A trumpet can be found on Amazon for $99; a trombone can fetch as low as $129 on some sites. while music stores can rent a domestic or Japanese horn with an option to buy for about $20 a month.  Are these instruments any good?

In my last two or three years a band director I saw horns brought in by students under the Mendini, Aamoon, Giardinelli and Moz brands, plus a few others I have forgotten, along with horns from more familiar brands as well.  These odd-branded horns, which more often than not come with white gloves (😅) sometimes would separate, come apart at the braces, had rather soft, dent prone metal and seemed to suffer from major fit and finish issues.  At one point early in my career Jupiter was a brand to run away from, suffering from some of the defects these newer horns have.  Repair shops wouldn't touch them. Taiwan based, they have truly improved over the years and are no longer cheaply manufactured.  Their XO brand line are professional horns.

I suspect that the standards for the lesser known brands are rising as well; they have to if they expect to keep selling horns.  In the instrument business these "knock-off" horns are called stencil horns, manufactured in a couple of Chinese factories and branded by the importer.  One such maker in Jin Bao, a company which is moving to improve workmanship on their products because they now have competition from other Chinese companies producing increasingly better made brass instruments all the time.   One such company, Eastland, has even purchased an American boutique trumpet and trombone maker, Shires, and is building and importing Shires designed instruments from the mainland.

In Europe, the English boutique trombone manufacturer Rath, a  maker of very fine professional trombones, teamed up in the last few years with a former builder in their factory, John Packer to collaborate on a new trombone, the JP/Rath line.  The horns are designed in the UK by Rath owner Michael Rath, built in China to Rath standards, and then shipped to the UK for final inspection and set-up before being exported world-wide.  I had been curious about these instruments, and knowing that I did not want to spend $5K on a Rath that I would never make my money back on, I ordered a large bore JP/Rath tenor trombone a couple of years back from a trusted dealer, Hornguys.com.  I had previously purchased two Wisconsin-based Getzen horns from them years back and still play them.

This new horn ran about $1750, maybe half the price of a Bach 42B and two-thirds of the price of a Conn 88H.  I received my horn in 80/20 brass rose brass, with a beautiful lacquer job and in a flawless condition.  I've lived with this horn on many concerts for the past two years and cannot find a fault with it. Tubing ferrules are artfully welded, with no sign of acid bleed around soldered joints or the bell bead.  There are no tooling marks whatsoever, and the slide right out of the box was great.  For the money it has played superior to any Bach that I have every played, and aligns itself quite well with the narrower slide Conn 88 style.

This instrument, and others in its class are considered intermediate, or step-up horns for the advanced student, but I must say that I have heard and read many positive reviews of these instruments by professionals. I've never had any hesitation about playing my JP/Rath in the concerts and shows that I do.  Now I am not a paid endorser of the JP/Rath line, nor am I of John Packer's own line of band instruments, but I do believe that in the instrument business you get what you pay for, especially at the lower end of the spectrum.  If I had a young fifth grader would I buy them a $99 horn online to start band, or a $1700 horn, not knowing if they will want to stick with it? Tough call, but I'd probably go the rental route for the first year; if progress is being made and my child was growing in musical ability and interest, yes I'd look at the intermediate instruments from JP/Rath, Yamaha, Jupiter, Bach and many others.  Brass students can grow with these horns, with little fear that the horn will crumble in their hands onstage.  I've seen that too!

If you have a question about one of these horns, I'll be happy to discuss them with you.  There are a lot of choices out there.  It can be confusing.
Saturday, January 26, 2019

Old-Fashioned Vegetable Soup


As I get older I am thinking more and more about the meals my mother used to make.  When I was young my parents scraped by more often than not with whatever they could get to feed their family.  Most everyone did in the Maxwell Street, and later Pilsen neighborhoods of 1960's Chicago.  There were many days in which we did without meat on the table.

Nowadays meatless meals are seen as good choices in cutting down or eliminating our intake of red and white meat, but back then it was sometimes a necessity not of choice.  When our family had one of those thin weeks (usually in the winter, before or after the heating bill was due), my mom would pick up garden vegetables at the store, which were cheap.  We didn't grow much except radishes in our back yard, because our dogs would usually ruin the plants.  One of her go to's was vegetable soup, some times with barley and other times with shells, macaroni or whatever pasta she had on hand. 

I have had a taste for this dish recently and came up with this recipe, which didn't quite match my memories of her soup, but came awfully darn close.  She made her own stocks to begin with; for vegetable stock she brought rough chopped onion, carrots and celery to a boil and then allowed them to reduce.  This stock was seasoned with spices she always kept around the house; salt, peppercorns, rosemary and thyme.  For this recipe, I opted for store-bought low sodium vegetable stock.  You could also use chicken stock, as she did if she had saved the bones from a previous meal.

Vegetable Soup (serves 4)

1 tbsp olive oil
1 cup medium chopped onion
1 cup peeled and chopped carrots
1 cup chopped celery (about two stalks)
3 cloves minced garlic
32 oz. low-sodium vegetable broth (1 carton)
1 can petite diced tomatoes, with juice
1 tbsp Worcestershire sauce
5-6 baby Yukon potatoes, peeled and medium diced
1/3 cup fresh parsley (or tsp dried parsley), chopped
2 bay leaves
1/2 tsp dried thyme
1/2 tsp dried rosemary, crushed
1 cup frozen or fresh green beans
1 cup frozen or fresh corn
salt and pepper to taste.
1 cup dried shells or other pasta
1 tbsp shredded Parmesan cheese

1. Heat the olive oil over a medium heat

2. add the onions, carrots and celery and saute for about 4 minutes, until the onions are clear, then drop in garlic and cook for another 30 seconds.

3. Add in broth, tomatoes,  potatoes, parsley, bay leaves, thyme, Worcestershire sauce and salt and pepper to taste.  You can add more dried herbs as you see fit at this time.

4. Bring to a boil and add the fresh or frozen green beans and corn.

5.  Bring this to a medium low heat and cover, allow to simmer for 30 minutes, until the potatoes are tender. The last 10-12 minutes add 1 cup of dried pasta of your choice. 

6. Serve warm, topped by a sprinkle of Parmesan cheese, with French bread.


Sunday, July 1, 2018

A Perfect Ribeye Steak Dinner


Many people shy away from preparing grocery store steaks at home because the meat often ends up over done, dried out and without much flavor.  It doesn't have to be that way.  There is a way to prepare this cut right in your own kitchen with very satisfying results. 

The most common mistakes are trying to cook the meat right out of the refrigerator, over seasoning them and moving it around constantly.  It's best if you have a cast iron skillet for cooking on a stove top, but an oven safe non-stick or stainless steel skillet will work just fine.

Don't throw the meat on a skillet or right out of the fridge.  A cold steak may not cook evenly. Salt and pepper the meat and let it sit about twenty minutes.  The salt will draw moisture out of the meat and enable more even cooking.  Here's how I like to prepare my ribeye steak:

Ingredients

1-2 medium steaks, about one half to three quarter inch thick
1 tbsp olive oil
1-2 pat of unsalted butter
sprig of fresh rosemary
salt and pepper to taste

Preheat the oven to 350 degrees.  Season steaks with salt and pepper to taste and let sit for twenty minutes.  In a cast iron skillet over medium high heat add the oil until it just approaches smoking point and place steaks in the skillet so that they are not touching.  Sear one side for four minutes without moving the steaks.  After four minutes the steaks will release easily from the pan. 

Flip steaks and put a pat of butter on each steak, as well as a whole sprig of rosemary.  Place the steak in the oven to finish, about 6-10 minutes, depending on how rare you prefer your steak.  I prefer medium well done, so 8 minutes works for me.  About halfway through, take a spoon and baste the rosemary infused melted butter in the pan over the meat.

At the end, remove the steaks from the oven and place on a cutting surface.  Let rest at least 6 minutes before cutting the meat.  I like to place ribeye strips over steamed or sauteed vegetables, or even brown rice, using the pan drippings to pour over the dish. The above photo I used a store bought vegetable medley that I steamed briefly and sauteed in a little butter in a side skillet, with a little salt and pepper seasoning.

Wednesday, May 30, 2018

Tucson Sunset on March 18, 2018


I was out for a walk on a pleasant evening in March, 2018 and spotted this beautiful sunset.  I ran back to my apartment and grabbed my camera, coming up with this shot.

Tuesday, October 17, 2017

Tohono Chul Park, Tucson, Arizona


With a little break from teaching over Fall Break, I decided to visit Tohono Chul Park, a desert botanical garden in Tucson, Arizona. The park is on 49 acres and offers classes, tours, plus dining in its bistro year round.

I took my camera but didn't plan specifically to shoot butterflies.  I was really out after blooming desert flowers.  However, the situation did present itself with desert bloom from a bush teeming with colorful butterflies skittering about nervously at my presence. I managed to capture a couple of these colorful insects going about their business. 

Sunday, July 2, 2017

Red Bean Salad/Salsa


This recipe is very flexible; you can use it as a salsa to top a grilled meat, or you can enjoy it as a salad or side dish. Either way it is fat free, delicious and canbe made with short cuts to reduce prep time.

Ingredients (about 4 servings)

1/2 lb red kidney beans, cooked or 14 oz can, drained
2 cobs sweet corn, steamed, or  11 oz. can low sodium whole kernel corn, drained
1-2 jalapeno pepper, diced (for hotter levels, you can substitute Serrano peppers)
2 large plum tomatoes, diced
1/2 red onion, diced
2 limes, juiced (about 2 tbsps)
Sprigs of cilantro, chopped
dash of salt to taste

Directions

If you are using canned beans and corn to cut prep time, drain the juice and rinse under cold water. I prepared my beans from dry to control salt, and prefer the fresher, sweeter taste of steamed corn off the cob, but either varieties are fine.

Dice all of the vegetables evenly and place in a large mixing bowl.  Add the beans and corn and mix well. Next add the lime juice and cilantro, salting according to taste.  Place in a sealed container and let sit in the refrigerator for at least an hour so that the flavors have a chance to blend.

You can serve the dish by itself as a salad, with a few extra sprigs of cilantro for garnish, as a dip for chips, or as a topping for grilled meats.  A very versatile recipe indeed!

Saturday, July 1, 2017

Easy Green Bean Salad


I love green bean casserole, but the heavy cream fat, salt and other added calories don't love me anymore! I was searching the internet and found a recipe at www.realsimple.com that I adjusted.  It wasn't bad, but right now in my fat detox phase I can't have the almonds that they call for, which gives the salad the extra crunch texture.  So I substituted a sprinkling of prepared French onions

Ingredients (serves 2)

1/2 lb fresh green beans, trimmed
Cherry tomatoes
2 tbsp Dijon Mustard
2 tbsp Balsamic vinegar
1 tbsp extra-virgin olive oil
1/4 cup Fried French onions (look for those prepared in vegetable oil and whole wheat flour.  You can also make these yourself by coating some onion rings in a little oil and flour, and then baking them until golden brown).
Dash salt and pepper

Directions

Preheat the oven to 350 degrees.  In a large pot bring salted water to a boil and cook the green beans for 5-6 minutes.  If you want them a little less crunchy, cook for a little longer and test for desired texture..  Remove, drain and put them in an ice bath.

Mix the Dijon, vinegar, olive oil in a large bowl and season with salt and pepper.  Drain the green beans and dry on a towel to remove excess water, then pour them into the bowl with the tomatoes and coat thoroughly with the dressing.

Lay out the green bean mixture evenly on a baking sheet and sprinkle with the onions.  Bake in the oven for about 30 minutes, or until the tomatoes begin to wilt. Makes a great side dish or a light lunch!

Beautiful Maui: Island of Many Awe-Inspiring Sights

Waterfall on the Road to Hana
Seven Waterfalls Area

Kaaanapali Beach

Morning Walk Scene Kaanapali Beach

View from the Beach Spa at Hyatt Regency

Sunset at Kaanapali Beach

Maui Leeward Side

Ancient Village Ruins on a Volcanic Flow

Black Rocks Near Hana, Maui

Friday, June 30, 2017

Vegetarian Chili


Here's another recipe that I have seen (this one from Martha Stewart) that I have adapted to my taste in my quest to detox off of meat and animal products for two weeks.  This one is easy and can be prepared on the stove, or as I did, in an electric pressure cooker. Lots of flavor and textures, all important in helping us to not miss the fats and meat.

Ingredients (serves 6-8)

1 tbsp olive oil
1/2 medium yellow onion, medium chop
3 garlic cloves, rough chop
2 stalks celery, sliced
1 small zucchini, quartered and chopped medium
1 green or red pepper, medium chop
1 jalapeno pepper, seeded and chopped
1 1/2 tsp ground cumin
1 tbsp chili powder
1 tsp chipotle chili powder *(a little more heat)
coarse salt and black pepper to taste
3/4 cup tomato paste
1 14.4 oz can diced tomatoes and green chilies (Rotel is fine)
1 14.5 oz can pinto beans, drained
1 14.5 oz can black beans, drained
1 14.5 oz can diced tomatoes
1 cup low sodium vegetable broth
sprigs of fresh cilantro

Directions

If cooking on a stove top, heat the oil in the pot and toss in the chopped vegetables. Heat through till the onions are translucent, then spoon in the tomato paste.  Continue saute until the tomato paste turns a shade darker, about 5 or 6 minutes.  Stir frequently.

Now add the beans, diced tomatoes and spices, holding off on the salt until the end, when levels to taste can be tested. If the mixture is too thick add some broth to desired consistency and cover, and simmer over medium low heat for 45 minutes.  At the end test for salt.  Serve with a few sprigs of cilantro as a garnish.

If you are preparing this in a modern electric pressure cooker, heat the oil in the browning mode in the inner pan and saute the vegetables and tomato paste as above before adding the beans, tomatoes, spices and stock.  Again save the salt for the end, to prevent over-salting.  Cancel the browning mode and set the cooker to soup/stew and lock on the lid, following the directions of your specific pressure cooker.  Set the time for 15 minutes.  When time has elapsed carefully vent the pressure cooker and let steam escape.  Once you can open the lid check the salt level and ladle out to serve.

Vegetarian Stir Fry


This dish is easy to prepare from readily available produce and spices in the local grocery, and takes little time to cook once the vegetables are cut.  The biggest absence here is beef, chicken, pork or shrimp, but with the proper spices and textures of the vegetables, you won't really miss them, unless you are a dyed in the wool carnivore.  I will list the vegetables to be used, but it's possible to find frozen, all natural stir fry vegetables in a bag, which can save you much time.  Just thaw them under running cold water or in a microwave, then pat dry before adding them to hot oil.

Vegetarian Stir Fry (Serves 2, or 2 meals)

Ingredients

2 cups cooked brown rice, prepared ahead of time
1 tbsp peanut oil or grape seed oil (handles higher heat better)
1/2 cup yellow onions, medium dice
1/2 cup red bell pepper, medium dice
1 cup sugar snap peas, trimmed
1 cup broccoli florets
1 cup mushrooms (any variety) , sliced
1 cup water chestnuts, sliced
1 cup green beans, trimmed and cut into 2-inch pieces
2 stalks celery, chopped
1 tbsp fresh ginger, minced
3 cloves garlic, minced
1/8 tsp Chinese five-spice (very potent and can take over a dish)
1 tsp sesame oil
2 tbsp low sodium soy sauce
1 tbsp garlic chili sauce (not very hot)
1 cup vegetable stock (or chicken stock if you have none)
1 tsp cornstarch
Salt and pepper to taste
1 stalk green onion, chopped for garnish
A few sprigs of Cilantro, medium chop

Directions

Cut or prepare all vegetables first and set aside, along with a slurry of cornstarch and stock.  Heat the oil medium high to high, near the smoke point in a wok or large, heavy pan.  Add the sliced vegetables and move quickly in the oil until the onions are translucent, then add ginger, garlic, chili sauce, soy sauce and five spice powder, moving quickly. You don't want to overcook the vegetables.

Reduce the heat and add the cornstarch slurry.  Drizzle over the dish the sesame oil and mix thoroughly to insure the vegetables are evenly coated.  Salt and pepper to taste. It shouldn't need much salt.

Mound a cup of cooked brown rice on a plate and spoon the stir fried vegetables over it. Garnish with a little extra sauce, chopped green onions and chopped cilantro, if desired.

There is a lot of flavor and textures in this dish, which will help to disguise the fact that there is no meat. Many substitutions can be made. If you don't like cilantro, leave it out. You can add or substitute cauliflower, corn, green peas - or any vegetable you fancy. For those who want more spice, Thai chilies, red pepper flakes or Sriracha sauce can liven it up.  So many varieties and all delicious!