Friday, October 28, 2022

Air Fried Chipotle Chili Crusted Chicken Breast with Cilantro-Lime Rice


The air fryer is really a mini convection oven, and its applications are many.  You can heat leftover foods quickly, prepare fresh or frozen chicken wings, make hamburgers, cook a steak, bake deserts and so much more.

One of my very favorite spices for chicken is chipotle chili powder, which has just a tiny bit more spice kick than regular chili powder, without being overwhelmingly hot. This preparation uses chipotle powder almost like flour, creating a savory crust with a hint of heat.  As a side, I am pairing the chicken with the cilantro lime rice side.  I recommend basmati or jasmine rice for their aromas, but long grain white rice will work just as well. The rice will take longer to prepare, so we will start with that.


 Cilantro-Lime Rice

Ingredients:

1 cup basmati or Jasmine (long-grain white) rice

1-1/2 cup water

2 tablespoons olive oil, divided

Juice of 1 lime

1 tsp chicken bouillon 

1 tsp onion powder

1 tsp garlic powder

1 bay leaf

1 cup chopped cilantro, not too fine.

salt and pepper to taste

Directions:

Rinse the rice in a strainer under cold running water for a few minutes until the water begins to run clear.  In a large sauce pot or deep-sided pan put in the rice, water, the juice of half a lime, 1 teaspoon of olive oil, the garlic and onion powders, bouillon and bay leaf.  Stir and bring to a boil.  You will have to keep an eye on the rice, boiling it until nearly all the water has evaporated and little steam holes begin to appear on the surface of the rice.  This should take about 15 minutes.  Once the water is nearly gone, pull the pan from the heat, fluff the rice with a fork and cover it with a tight lid for at least another 15 minutes.  Do not peek!

The rice should be very fluffy at the end of this time and not sticky.  Pour the rice into a mixing bowl and mix in the juice from the other half of lime, the second teaspoon of olive oil and the chopped cilantro.  Taste for seasoning and add salt and pepper as desired.  Cover and set aside.


Chipotle Chili-Crusted Chicken Breast

Ingredients:

1 chicken breast, split or butterflied (you may also use chicken tenders)

4 tsp chipotle chili powder (you can use regular chili powder, but it won't have the little spice kick) 

4 tsp cumin

2 tsp Mexican oregano (or just oregano)

1 tablespoon olive oil

salt and pepper to taste

1 lime, cut in half

Directions:

Prepare the dry ingredients is a bowl, mix and spread on a plate or shallow baking dish.  Preheat the air fryer to 400 degrees for 3 minutes.  Make sure the chicken is dry and free of excess water.  Pour the olive oil on the chicken and rub on both sides.  Season to taste with salt and pepper.  Coat the chicken in the spice mixture on both sides, making sure all parts of the split breasts are coated.

Place the chicken in the air fryer and set for 6 minutes at 400 degrees.  At the end of the time, open the fryer basket and turn the chicken over.  If you have an instant read thermometer check to see if the chicken is 165 degrees.  If it's there, reset the fryer for 350 degrees for about 3 or 4 minutes to crisp the second side without overcooking.  You may need even less time for the other side.

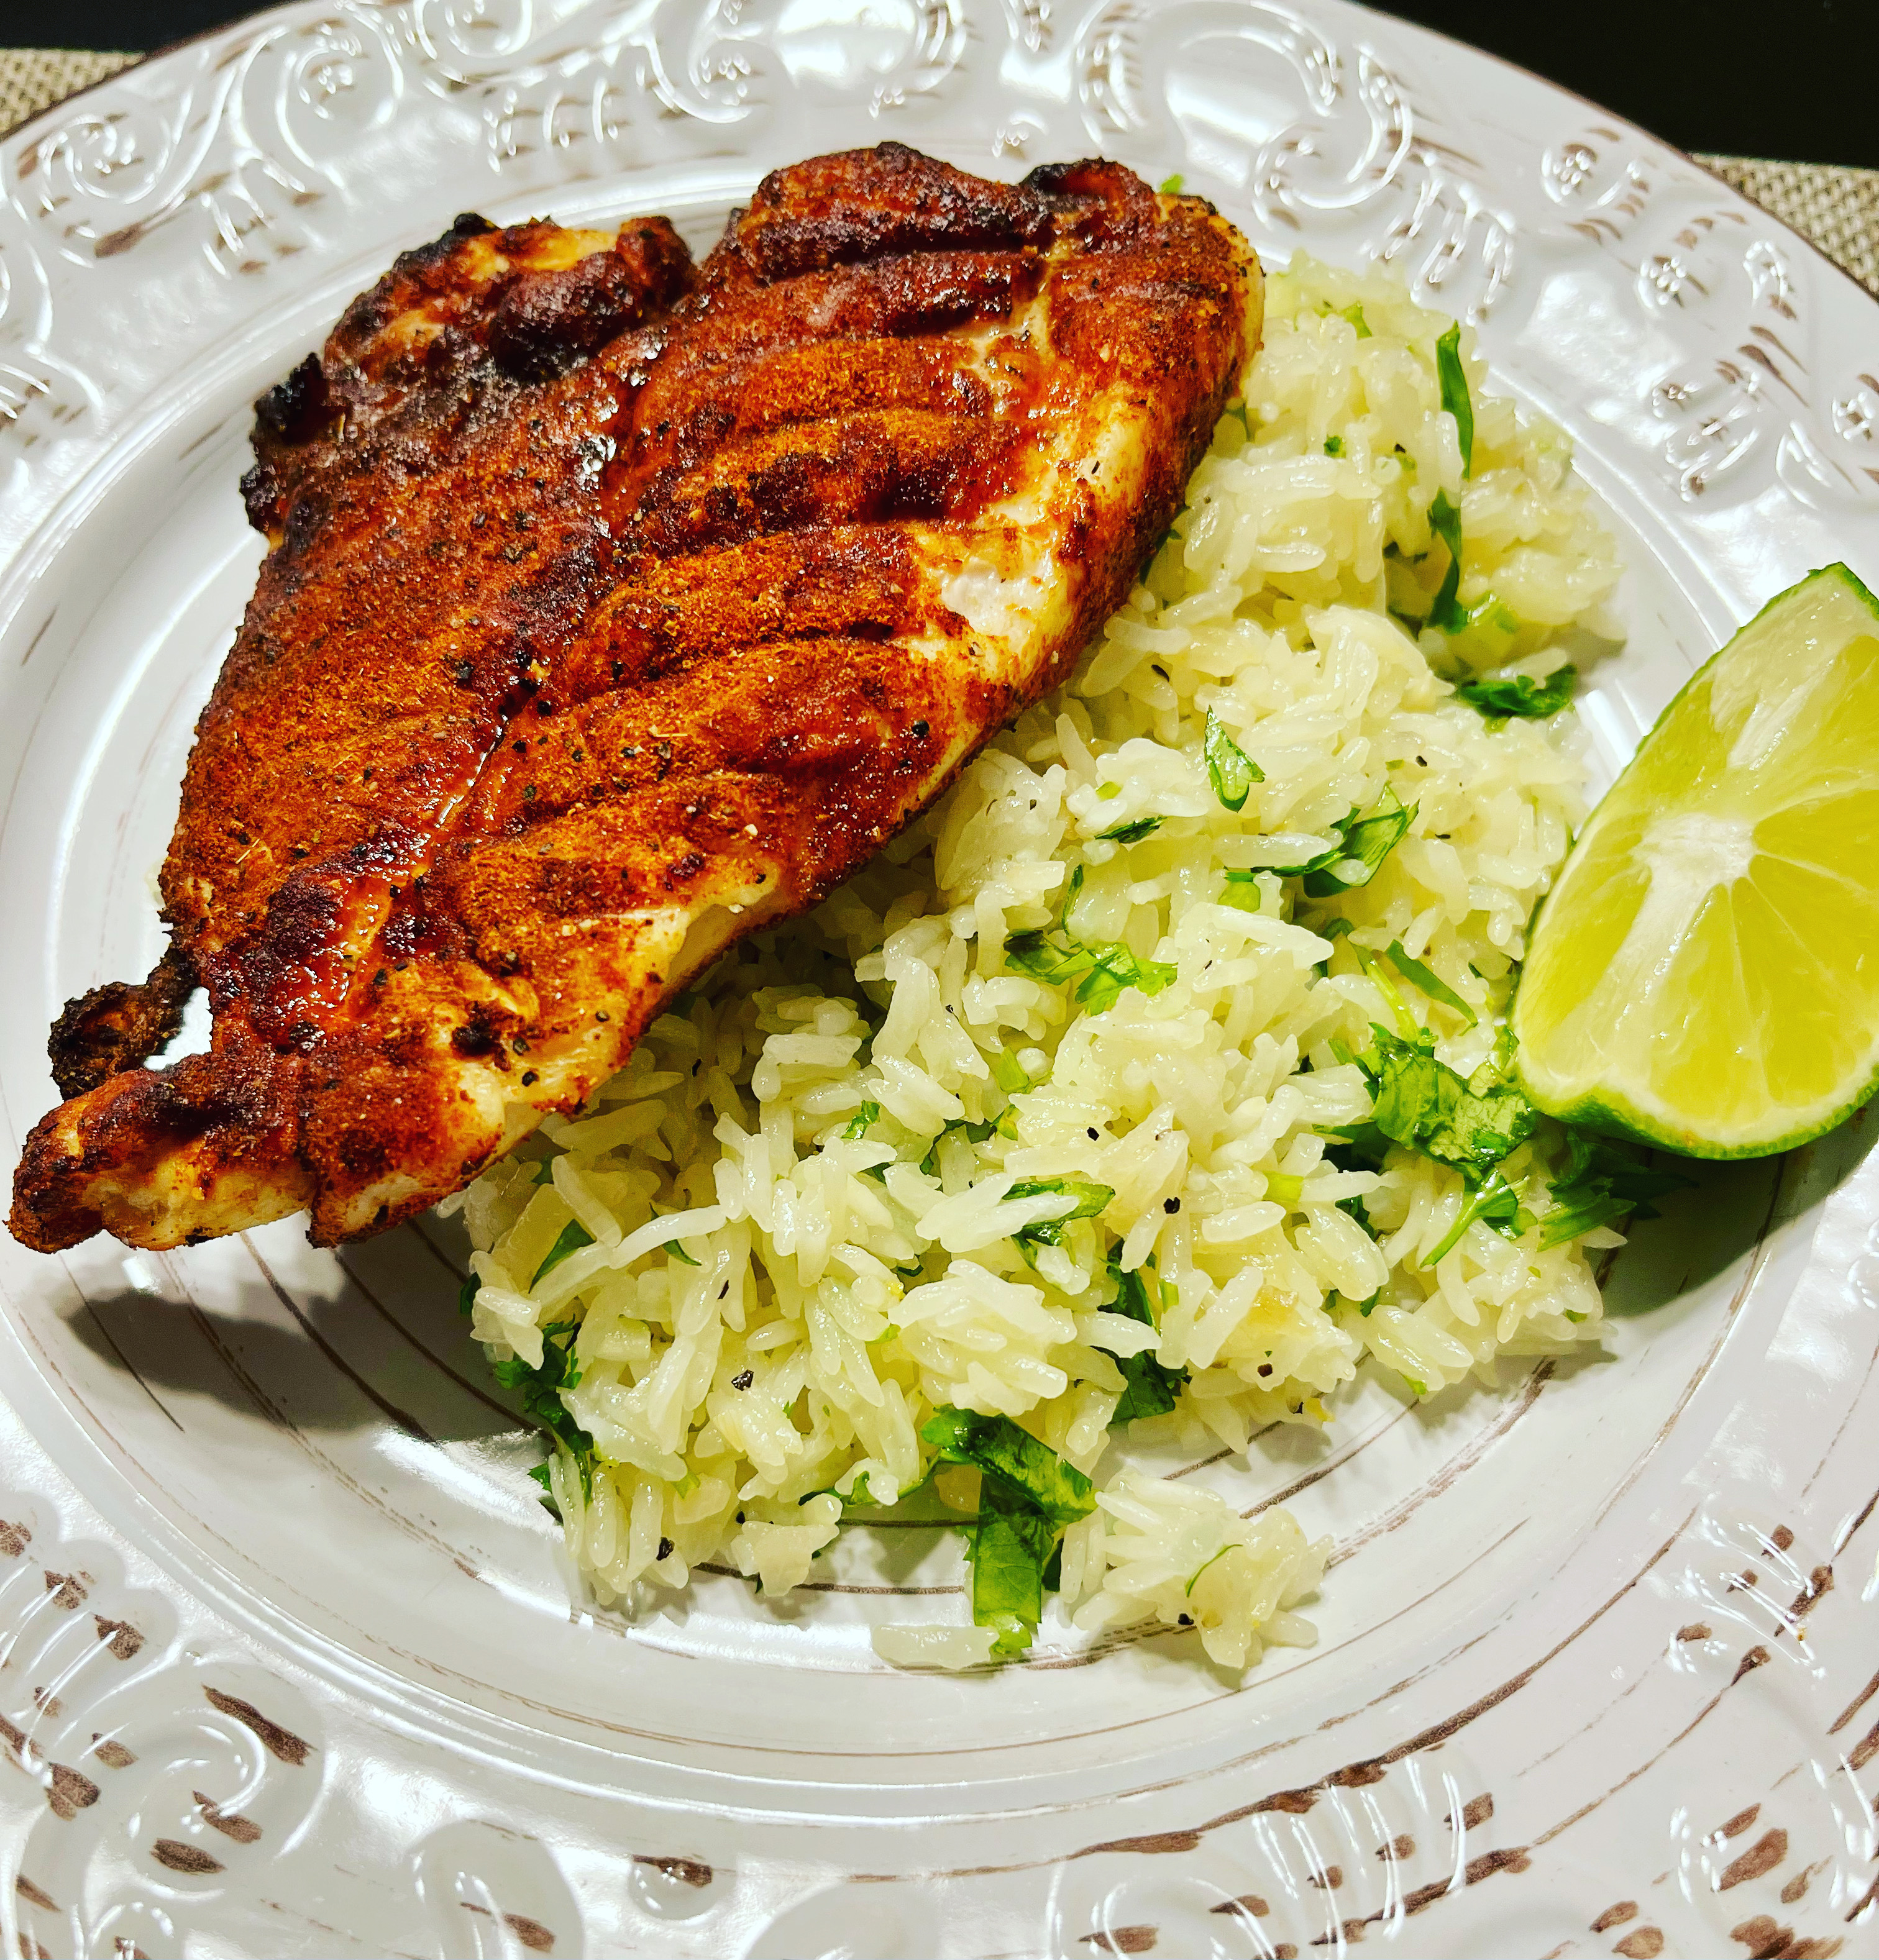
Mound some rice on a plate and set the chicken up against it.  A squeeze of lime on the chicken adds a nice touch to the full flavor of the chipotle chili and will complement the rice.  This goes well with a Mexican beer!


Tuesday, September 13, 2022

Air-Fried Lemon Pepper Chicken Wings


 In recent years the air-fryer has become a staple appliance in many of our homes.  It crisps well, it's fast, and it requires the use of far less fats while  "frying" meats, potatoes and other food items.  That being said there are sometimes unsatisfactory results when preparing popular foods like chicken wings. They can come out soggy, undercooked or just plain bland.  Most of these problems stem from preparation.

If you want crispy, uncoated, yet juicy wings, here is the key; the chicken has to be as free from water as possible.  This means not air-frying them while frozen.  Also, there are some preparations which call for the wings to brine in buttermilk or salt water for a few hours or overnight.  If you are deep frying them in oil, this method works.  But we are not using much oil, and we are not breading the wings after they have been brined.  In fact, all we are doing is patting the wings very dry right out of the package, or if you prefer to rinse them, after they have been rinsed in cold water and drained from a bowl.

Here's what you need for a dozen wing parts (I don't use the wingtips):

Mix these seasonings in a small bowl - 

1 Tbsp Lemon Pepper mix, any brand

1 Tsp Kosher Salt

1 Tsp Garlic Powder

1/2 tsp Paprika

(Optional) Tsp Old Bay - this also contains salt, so be aware

Preparation -

Preheat the air fryer to 380 degrees for about 3 minutes.  While the air fryer is preheating. add the dry wings to a bowl and spray them with a cooking spray or pour a teaspoon of avocado oil on the wings and stir to ensure even coating. Next sprinkle the seasoning on to taste and mix the wings again to assure even coating of the seasonings.

I know at this point there are some methods which call for using a corn or potato starch coating for extra crispness,  This is certainly an option, but it requires the use of extra cooking spray to cover the each side of the wings during the cooking process.  That adds more fat, but again it's a choice.

Using tongs, place the wings well spaced in the air fryer basket so that they don't touch, which results in steaming and less than uniform crispiness.  Depending on the size of the basket this might require two batches.  If you have used a starch you will have to use your cooking spray to coat this side of the  chicken now.  Close the basket and set the fryer for 10 minutes at 380 degrees.

After the 10 minutes, flip the wings on their other side.  Use your cooking spray again to cover the starch on this second side if you used it.  Set the timer again for 10 minutes and 380 degrees.  At the conclusion of this time, flip the wings once more to the first side. This time set the timer for 5 minutes at 410-420 degrees, or what ever your air fryer permits, and reinsert the basket.

If you prefer Buffalo-style wings, while the you are in this final stage, Frank's Red Hot sauce or your choice of hot sauce can be added to a bowl and the wings tossed in from the air fryer.  Some would add melted butter to the sauce before tossing, but the added richness of the butter probably is not needed here.  Again we have choices, because it's a very flexible preparation.  It can be reduced fat, reduced sodium and keto-friendly, or you can include more fat and carbs in a coating.

I serve my wings with fresh cut celery stalks with ranch or blue cheese dips, or more hot sauce. A garnish of parsley or cilantro completes the serving. 


Tuesday, July 12, 2022

Oven Roasted Reverse Seared Beef Sirloin Tri-Tip


 The Sirloin Tri-Tip was first known in here in the US in Central California as the Santa Maria or the Newport Cut.  In recent years this relatively inexpensive cut has become known and more popular East of the Mississippi River. It's a triangle of meat that usually weighs about 5 pounds trimmed, and is a versatile and forgiving cut of meat, capable of being prepared many ways, from simple roasting to smoking, grilling to pan searing.  The meat is tender and favorable, as long as it is cooked medium rare to medium.  The fibers do tighten up considerably at higher temperatures.

Most recipes  that I have seen or read commonly call for the cut to be treated like a brisket, though it does not require nearly the twelve hours to prepare a tri-tip properly as it does a full packer cut brisket. The preparation method that I prefer is called the Reverse Sear, where the meat is seasoned, then smoked, or roasted at low temperatures until the internal temps are medium rare to medium, and then allowed to rest 15 minutes.  This ensures the juices are re-absorbed  into the meat.  The cut is then grilled or pan seared over high heat for color, which only takes a few minutes.  I like to marinade the meat overnight, but it is not necessary.  This recipe is based on a preparation by Sam Zien, of Sam the Cooking Guy on YouTube, and is easily my favorite.


Marinade:

1/2 cub low sodium soy sauce

1 cup olive oil

5-10 cloves crushed or diced garlic

1 tsp black pepper

Other ingredients:

1-2 tbsp. olive oil

1-2 knobs of butter

Sprig of thyme (optional) 

Directions:

Most tri-tip roasts from the supermarket have the fat cap and silver skin well-trimmed, but you may need to clean up these areas.  I don't mind a thin fat cap, especially if I'm grilling it over flames. The meat may be tenderized at this point if you have one, but it is not necessary.

Combine the marinade and pour it into a sealable gallon bag.  Seal the meat in the bag with the marinade and move it around to coat the entire tri-tip,  If you have overnight to let the meat marinade in the refrigerator that is great, but a minimum of four hours would be ideal.

Remove the meat from the refrigerator and let it set on the counter in the marinade for a hour, or until it comes up to room temperature.  Preheat the oven to 275 degrees.  

When the meat is a room temp, remove it from the bag and place it on a wire rack in a shallow pan. A meat thermometer comes in handy here.  Insert into the thickest part of the roast and place on the center rack, uncovered.  Roasting times will vary per oven, which is why it is best to use a meat thermometer.  For medium rare the meat should be pulled at 128-130 degrees.  For medium, 135 degrees is best.

Let the meat rest with a sheet of loose foil covering for about 15 minutes.  The meat will continue to cook internally while sealing in juices.  While the meat rests heat a cast iron pan over medium high heat and add some of the marinade to the pan if you wish, or a tablespoon of olive oil and a couple knobs of butter and the optional thyme sprig.  When the pan is hot, sear the roast about three or four minutes on each side, basting with the oil and butter as it sears.  You are looking for color, not to cook the meat any more internally.  

When the color you want is achieved, the meat can be removed and sliced immediately, because it has already rested.  Tri-tips have fibers running in two directions; the long end toward the narrow tip, and the short end running away at an angle. You can separate the meat at this juncture for ease of slicing. You want to cut across the grain, not with the grain.


Serving:

With the drippings from the pam and some of the marinade, its possible to make a pan gravy with a little flour.  Be sure to heat the marinade to a boil in order to avoid raw meat contamination.  The tri-tip also goes well with a chimichurri sauce dressing, made with minced cilantro, garlic, olive oil, salt and red pepper flakes.   


Saturday, June 18, 2022

Baked Barbecue Beans


 It is easy to grab a can of those commercial beans at the supermarket and toss them into a sauce pan and heat them up.  I'm not knocking it; we all have done that at one point of other in our busy lives while preparing meals for our families.  But if there is extra time available, why not prepare baked beans with a little more love, and a lot less sugar than is contained in our favorite store-bought brands?

It starts with the choice of beans.  I mean after all, they are the star of the show! You can use any kind of bean variety that you like, though the canned variety most often use Great Northern beans.  I prefer red beans personally, because they have a bit more texture and heft to them, which means more flavor to me.  I prefer them dried and soaked in water overnight, but if pressed for time, a couple of low sodium canned red beans, liquid drained are a suitable alternative.  If using dried beans, don't salt the soaking or the cooking water, because that can toughen up the red beans.

Preparations:

Drain the soaked beans and place them in a pot of fresh water, bringing them to a boil in a medium large pot.  Some folks like to add pork shoulder or some type of smoked meat with onions in this step, but I prefer to control the amount of fat.  But that's an option available.  Turn down the heat and simmer for about an hour.  While the beans are simmering, the ingredients for the sauce may now be prepared.

You'll need:

1/2 medium onion, diced

1/2 red bell pepper, diced

1 jalapeno pepper (optional), seeded and diced

3-4  strips thick cut bacon, diced

1/3 cup brown sugar

1/3 cup molasses

1-1/2  cups of barbecue sauce, any variety (less sugar varieties are best)

1/4 cup ketchup

1 tsp Worcestershire Sauce 

1 tbsp yellow mustard

1 tbsp smoked paprika

1 tsp chili powder

1 tsp garlic powder

1 tsp onion powder

Salt and pepper to taste

Directions:

Heat the oven to 350 degrees.  Sauté the diced bacon in a large pan until the fat renders, then add the chopped onions and peppers, heating until the onions are clear.  In a separate bowl combine the wet and dry ingredients and stir to combine, then pour the prepared sauce into the pan, stirring until incorporated.  Let it come to a simmer, but do not reduce.

Drain the beans and pour them into a large casserole dish. Pour over the prepared sauce from the pan and combine well in the dish.  The sauce will appear a little thin at this point. If you are adventurous, strips of bacon may be laid over the beans, but it's totally optional. Place the dish in the oven, uncovered for about two hours, or until the sauce has reduced.

At the end of this time the casserole dish may removed.  The excess liquid should now be reduced and the beans nestled in their thick sauce.  Spoon out and garnish with parsley next to your smoked or barbecued meat of choice.  It's so much better tasting than the old canned standbys! 

Friday, June 17, 2022

Easy Oven Baked Baby Back Ribs


Nothing really says summer like smoking, grilling or barbecuing ribs in the back yard or on the patio.  But let's face it, mother nature sometimes doesn't want to cooperate.  You have that taste for ribs, but it is rainy, too cold, or as often is the case here in Arizona summers, the temperature is too hot, over 110 degrees.  Who wants to cook outdoors in those conditions?

But there is an easy alternative, even in the most inclement of conditions - our kitchen ovens.  I like baby back ribs because they are more meaty, but spareribs will also turn out great in this recipe. As for dry rubs, there are many, from your favorite bottled dry rubs to home made.  And if those don't suit your tastes, even salt and pepper will work great.  Below I'll list the ingredients that I like to use for my custom dry rub.


Preparation: Preheat your oven to 350 degrees

Pork ribs a have a membrane on the bone side that I like to remove.  Some keep it on, but I find that my ribs come out more tender when this silver skin is removed.  To remove it, use a butter knife and push it under the membrane alongside one of the bones near the end of the rack.  Give it a tug up, then grasp the membrane with a paper towel and pull it away from the ribs.  Then pat the rack dry on both sides.

For a spice binder when I'm smoking outdoors I like to use plain old yellow mustard, spread lightly across both sides of the ribs. For indoor cooking, olive oil will give the ribs a nice crispy crust.  Use a brush to coat the ribs on both sides.

The Rub:

There are some great commercial dry rubs easily available in the supermarket.  I have used them, and have even used Old Bay, which works great too.  My favorite scratch-made rub is as follows:

1 tbsp kosher salt

1 tbsp black pepper

1 tbsp garlic powder

1 tbsp onion powder

1 tbsp smoked paprika

1 tbsp chili powder

1/2 tsp cayenne pepper (optional)


Procedure:

Season the oiled ribs generously on both sides with the rub.  Place the ribs on a large cookie sheet over aluminum foil, do not cover.  Bake the ribs on a middle rack for two hours at 350 degrees.  At the end of that time, carefully removed the ribs from the foil and replace it with new foil.  Turn up the oven temperature to 450 degrees.

While the oven heats up, place the ribs back on the cookie sheet and liberally brush on your favorite barbecue sauce. When the oven is at temperature place the ribs back in the oven for ten minutes.  Set a timer for this so it's not left in too long.

Now set the oven to broil and place the ribs on the top rack for three minutes.  It might be helpful set the timer once again.  Pull the ribs out and let them rest for a few minutes; they will be very hot.

Brush on more barbecue sauce and enjoy with baked barbecue beans and a creamy, crisp coleslaw.  These ribs are not the fall off the bone variety, but they are very tender.


Monday, March 8, 2021

Medicare: My Experience Navigating Through Enrollment


If you are in that elite group of folks, like me, who are about to turn 65, you are no doubt being bombarded by robocalls and junk email imploring you to sign up for a Medicare supplement plan of some kind to augment the coverage Medicare provides. And of course if you watch daytime television, just about every hour there is some Medicare coverage plan being advertised, especially during the enrollment period.  They like to use the word "free" a lot. This article is not about detailing choices for you, because I am no more than another fish swimming in the Medicare sea, with no special knowledge.  There are others sources far more knowledgeable than I am.

For more in depth information I would urge those who need it to log onto www.medicare.gov, or simply call your Medicare office for specific information.  I would not go online and give personal information like phone numbers or email addresses some of these companies advertising on TV.  Expect to be deluged with calls, texts and emails if you do.  

My goal here is to discuss my own recent experience, and some of the steps that I took to get answers to my questions.  My situation will not be the same as yours, so your choices will be different. But I would advise everyone to go directly to the source first, that is Medicare or Social Security.  If you don't have one, sign up for a secure account on their websites, and keep passwords safe and secured.

I retired early from teaching at age 62; while teaching I enjoyed a relatively low cost, school-district subsidized health insurance through one of the major healthcare providers .  I was in relatively good health and on a PPO plan; I liked my doctor and the plan benefits, so naturally it was a no-brainer for me to continue paying on my own through the pre-Medicare years of my retirement.  Also, knowing the political uncertainties in ACA, that decision seemed like a safer, though more expensive choice.  And expensive it was; my monthly premiums in retirement, even with a supplement from my state's pension system, was nearly $700 a month.  That's a far cry from the $120 a month single coverage I enjoyed as a fulltime school employee.  

But this is a a lament that so many retired teachers and other government workers have had to voice, and I was not supporting a family anymore.  If I had been on a family plan, my monthly costs would have been well over $1000 monthly.  So obviously, I was very anxious to learn how Medicare coverage would reduce my monthly healthcare costs.  I had been able to deduct my premiums on my tax returns, thankfully, but it still has been expensive.

There are a lot of terms and phrases that that you have to become familiar with, starting with Original Medicare, enrollment periods, Medicare Parts A, B, C and D, Medicare supplemental plans, Medigap plans, Medicare Advantage plans, HMO, PPO plans inclusive. There is so much more.  What were these plans, and how could I tell what was best for me?

I actually started my search on YouTube.  Being a visual learner, I found  many channels there which helped me to define better what my choices were, and where I was currently.  In addition, my state retirement board and Social Security had each mailed packets of good information, which I used to further refine my knowledge.  Going on the Medicare site also provided a great deal of background material that I knew I would need.

Ultimately, what helped me most was being a member of AARP.  Through them I learned that my own healthcare company offered several AARP-endorsed Medicare plans to cover Part C and D, plus dental and vision.  I obtained spreadsheets from other companies too, and finally decided to contact my insurance company directly, working though a local agent.  I settled on one of their PPO Medicare Advantage plans that seemed closest to what I was already paying for, at a fraction of my current cost, beginning on the first of my birth month.  Ironically as I was recently working with my agent over a Zoom call, my Medicare card actually arrived.  Social Security had automatically enrolled me 90 days ahead of my birthday.

There are a lot of details here which informed my choices, but I don't want to get bogged down in them because my situation probably won't apply to others.  I'll just say that there is no need to feel apprehensive about the process.  There is simply too much information material available to throw up your hands.  Reach out to the government agencies.  If you are a phone person, you can easily find a person-to-person contact there to help you.  If you are like me, I like to compare visual information, so online resources worked best.  At the very least, you can contact your own healthcare provider for answers.  

The best thing about Medicare coverage is that you are not forever locked into a plan.  If a specific plan isn't working for you, it can be changed during the next enrollment period.  Ultimately we are responsible for our own choices; if we have the best information available, we are in a much better position to make good choices.  Good luck!


Wednesday, August 26, 2020

Easy No Knead Bread


 People often find bread making an intimidating task, and yes we are talking about some basic chemistry here anytime we contemplate baking, but we are not building an orbital booster here! All we want to do is make an easy bread using some basic equipment any home cook likely already has.  The one piece of equipment that might be lacking is a Dutch oven.  But even if you don't have one, a good cast iron skillet will work! And don't worry, you don't need a fancy, expensive stand mixer either.

This recipe is also beneficial on a couple other fronts.  If you've been in the stores during the current pandemic you might have found that yeast is sometimes hard to find.  And if you have yeast, you may be asking yourself if you have enough.  Well this recipe only takes 1/4 teaspoon of yeast, so if you find yourself scraping the bottom of that yeast jar, you'll probably have enough.

Also, people with arthritis will find this recipe useful because their is no kneading involved.  Basic chemistry and mother nature will take care of that.  You will need a scraper, or a spatula, which I use to shape the dough into a ball. If you are on a Keto diet, you can substitute almond or coconut flour.

Ingredients:

3 cups of bread flour or all-purpose flour (either will do), sifted into a large bowl.

1/4 Tsp yeast

11/2 cups hot tap water (no hotter than 130 degrees, or it will kill the yeast)

1 Tsp salt

1-2 Tbsp of flour reserved for the bench to shape the dough

Two large bowls, one filled with parchment paper

Preparation:

Combine the salt and yeast with the flour in the bowl and mix.  Then pour in the hot water and mix with a spatula until the until the flour begins to come together, and no dry flour is on the side of the bowl.  Cover this bowl and let it stand for at least three hours.

After this time you will see that the dough is bubbly and should have nearly doubled in size.  Flour your working area and pour the dough out onto it, taking a spatula or a scraper and folding the dough over several times into the shape of a ball.  Sprinkle more flour if you find the dough too sticky to work with.

Now take the dough ball and place it in the clean bowl in which you have placed a large sheet of parchment paper.  It is okay if the parchment spills over the side of the bowl.  Cover this bowl with a towel for 30 minutes.

While your dough is rising a second time put into a cold oven on the middle rack the Dutch oven with the lid on, and then preheat the oven to 450 degrees.  When the 30 minutes have elapsed, carefully remove the dutch oven from the stove with mitts and set aside on a heat proof surface, removing the lid.  A large elevated wire rack works great for this, or if you don't have one the stove top will be fine. Then carefully lift the parchment and dough ball out of the bowl and place them inside the dutch oven, replacing the lid.

Return the Dutch oven to the oven and bake, lid on for 30 minutes.  At the end of that time remove the lid and continue to bake for another 10-15 minutes, until the bread is a nice golden brown. At the end of this time, remove the Dutch oven from the stove and let cool off on the rack or stove top.  It bears repeating that the Dutch oven and lid will be extremely hot during this, so please exercise due caution when handling it.  Handling the hot Dutch oven is not a task for kids!

The bread will be very easy to lift out of the Dutch oven by the parchment paper and will have a nice rustic look.  There are all kinds of variations for topping this bread while baking, but the standard recipe above works well. 

If you do not have a Dutch oven, you can use a good large cast iron skillet.  You won't be able to cover it, but the bread will rise just fine.

If you desire to have your bread rise overnight for baking in the morning, use cold water rather than hot.  That will increase the proof time to eight hours, but the results will be the same, a nice bubbly dough ball that has self-kneaded by the action of the yeast!   Enjoy!